Monday, February 15, 2010

How to Lay Ceramic Tile


Time to change that old vinyl flooring to some new updated ceramic tile!

First, we need to scrape all of the old flooring off.


We have Henry's Adhesive Remover to apply to the concrete to help loosen up the glue from the vinyl flooring.


After letting the adhesive soak in the glue for about an hour or two we....


begin to scrape the glue off.


Now that we got all the glue off we're going to sweep all of the little debris off.


Now we're ready to lay out the tile. Basically, we are going to start from the middle of the room and work our way out. We're going to snap a square line down the center of the room. By doing this it makes everything symmetrical.


Now that our layout is all ready we're going to mix our adhesive. Make sure to follow directions carefully. You don't want it too runny and you don't want it too dry. I think the best way to explain it would be the consistency of cake batter.


With a drill motor and a beater you can be sure that it is well mixed. Watch out for any dry powder still in the bucket!


Now with our line snapped and our adhesive mixed we're going to lay our first row of tile right on the line. I'm also using a laser on top of the line so that in case I go over the snapped line with the adhesive I am still able to see the beam of light from the laser. When spreading the adhesive...don't forget your notch trowel. We're using 1/2" knotch trowel with 1/4" spacers.


24 hours later.....
Now that our tiles are set we want to vacuum out the grout lines to remove any debris and excess adhesive.


We are using a sand texture grout. Again, be sure to read all directions. Just as with the adhesive, you don't want it too runny or too thick. It should be similar to the consistency of the adhesive.


The tools needed for this step are our grout tool, our grout, a clean sponge and clean water. Apply the grout in the space in between the tiles. Wipe it with a DAMP sponge. Don't soak the sponge. Use a wax on...wax off kind of motion. (man, I love that Karate Kid). Wax on the grout into the space and wax off the grout onto your sponge leaving grout only in between the tiles.


With our grout all finished and everything cleaned up, allow 48 hours to pass so that the grout can cure. Then you're going to add a grout sealer.


This is the grout sealer that we're going to be using. If you don't apply this and you spill a cup of coffee or some Kool-Aid it will stain your grout lines and even the tile. It is a must that we apply the grout sealer. Spray the grout sealer all over your tile. Don't be afraid that you'll spray too much. The more the better. Let it sit for 5-10 minutes so that it can soak in the grout and tile. Then wipe it off with a nice clean cloth. And you're done!

Sunday, November 15, 2009

How to Install a Garbage Disposal


First we need to find out if the garbage disposal is deffective. Turn on the switch and listen. If you have no sound at all, make sure your garbage disposal is plugged in correctly. If there is a sound (like a humming sound) but the actual teeth/blades aren't moving, then what you want to do is manually turn the blades. Sometimes water can turn to rust and bind the blades from moving. This is what can cause the humming sound. How to do this? Unplug your garbage disposal. Get an allen wrench key and go to the bottom of the garbage disposal and there will be an allen wrench socket for that key to go into. Turn either counter clockwise or clockwise. Doesn't matter. You might have to use a little pressure. If it turns freely, plug everything back in and turn it on. If you still have no sound, check the reset button that's next to the allen wrench key. If still nothing, you probably have a deffective garbage disposal. So let's replace it.


Unplug the deffective garbage disposal. By the way, I see a problem here. They were using a regular household plug for the garbage disposal. That's a no no. They should have a GFI outlet that the garbage disposal plugs into. So if you have this situation and you're within 4 ft of a wet area you should really have a GFI outlet that your disposal plugs into. (A GFI outlet is one that has the red and black buttons. One will say test and the other says reset)

Now with no power going to the garbage disposal we need to unhook all of the hoses and traps from the garbarge disposal.


Take the allen key and put it in the hole at the top of the garbage disposal indicated in the two pictures above. Turn clockwise until it turns off. You should only have to turn a half of turn and it should drop out of the sink. Be careful, there could still be some chunks of food or water in it so keep it upright.


Now with the garbage disposal out of the sink, it's time to put the new garbage disposal in. You can also replace the silver ring that's attached to the actual sink. But in this case it's still good and there's no reason to replace it.


If you have a dishwasher you're going to have to pop this piece out that's blocking the dishwasher drain. Your dishwasher hose drain is going to connect to this one inch drainhole from the garbage disposal. (very important to remove this piece otherwise it will be VERY MESSY when you put a load of dishes into your dishwasher. hahaha)


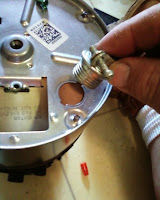
A common mistake that a lot of people make (even me) is when they unscrew the electrical plate to hook up their new pigtail plug they hook it up in the box itself (as seen in the second picture). But now you can't put the cover back on with the cord of the pigtail sticking out of the box. The right way to do it is...


This is the right way. First get a connector (picture 1). It may not come with it. Screw it into the hole next to the wire panel as seen in picture 2. Then install your pigtail through the connector and out of the box. Connect black and black, white and white and screw the ground (which is the green) to the green screw as seen in picture 3.


Now with everything wired and ready to go we're going to hook up the new garbage disposal to the sink. We're going to get our trusty allen wrench and slide it in the hole of the mounting bracket. While holding the bottom of the garbage disposal firmly to the sink you need to turn it a half turn. It should tighten right on as seen in picture 1. Then hook up the trap. IMPORTANT: make sure to use a new gasket when hooking up the trap. The garbage disposal should come with one. If you have a dishwasher, don't foret your dishwasher drain line. And we're done!


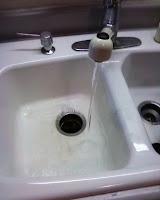
Now that we've got it plugged in, turn the water on, making sure it's on the garbage disposal side of the sink and turn the garbage disposal on. Let it run for about 15-30 seconds as you're looking underneath the sink for leaks. If everything looks and sounds good...then you're good! Way to make it happen with Ron!

Monday, August 24, 2009

How to Install Vinyl Windows

Most houses have to retrofit windows because the measurements of the old windows are odd sizes. Home Depot, Lowes and other major hardware stores won't carry the odd sizes so you will have to retrofit (special order) the new window. In this case, my friends, the Chases, have new construction size windows. Meaning the windows are 4x4, 3x3, 5x5, etc (even though it is not a newly built home). This means that Home Depot and Lowes will carry these size windows and there is no special ordering involved. However, these windows come with a plastic flange that plaster or siding will attach to. I will be cutting off this plastic flange so we don't have to damage the existing plaster and re-lathe and plaster around the new window. This way will save time and money. I will be adding backer rod and caulking to it. I'll show you. Let's make it happen!


Your standard 4x4 wood window. We want to update the house by putting in a new standard 4x4 vinyl window.

First we want to measure the existing RO (rough opening) to make sure that the window that we purchased will fit in there BEFORE we take apart the old window.


Now that we know that the new window will fit we want to take out the old window without breaking it and the way we do that is by prying all the existing molding from the inside jams. Those are what are holding the window in.


From the inside of the house you want to take out all the casing (molding) from around the window. Without this molding the window should come right out.


Most old sliding wood windows will have a wire or some kind of spring on the sides of the window so that the window won't slam shut. When taking out the window you'll have to remove this wire or spring. In this case it's a spring and we're cutting it off with snips.


Now that we have our inside pane removed we move to the outside. Pop the exterior moldings off and....


it should slide right out! Again we'll have to snip out the spring. On this particular window both panes were able to slide so both panes had a spring (or in some cases a wire)


Break time! Just kidding. Now that we have our old, outdated window taken out and the inside jams are all smooth (no nails) we're ready to install the new window. First let me show you what I was talking about with that flange.


This flange is used to attach to the king studs (the 2x4s on the sides), the head (the 4x4 on the top) and the sill (the 2x4 on the bottom). We will not be using these flanges to attach the window to our framing because we do not want to mess up our existing plaster. If we were to use these flanges we would have to take 6 inches of plaster out all the way around the window and then screw the flanges to the existing framing (king studs, head and sill). I would not recommend cutting the flange off unless you have a 3/4 inch slope windowsill. With the 3/4 inch slope windowsill water will never enter the window because water travels downhill and not uphill.

You want to pre-drill a hole in the bottom, top and sides of the window so that once you have the window up it's easier to screw it in.


Center your window. In this case we have a 48 inch RO (rough opening) and a 47 1/2 inch window. So, by centering the window you will have a 1/4 inch gap on each side of the window. Set a 1/4 inch shim on each side of the bottom of the window and screw both ends of the bottom. Make sure you are flush with the interior of the drywall so the molding can go right around it.


Level up the side and...


screw the top. Again, make sure the top is flush with the interior drywall. The exterior side doesn't really matter right now because you are going to cover it with molding anyway. Do the same to both sides of the window.

Now with the window installed add backer rod (a foam round backing) Backer rod is so that you don't waste a lot of caulking. You want to push your backer rod about 1/4 inch into the gap between the window and the framing. Install the backer rod all the way around the window. **Side note: Another option is to use spray foam but to me it's messy (it'll get all over your new window), it costs more and backer rod is just plain easier to work with. **


With your backer rod installed go ahead and caulk around the window applying the caulk against the backer rod (1/4 inch deep). Most caulking says it won't shrink but just in case check it in the morning and make sure there are no shrink spots. Shrink spots are gaps or holes where water can get through and cause water damage. After your caulking go ahead and apply your finish molding to the inside and outside of your window.


And...you're done! Once again...we made it happen! Stay tuned to see how me and Mr. Michael Chase apply the molding.


P.S. Thanks to my friend, Heather, for taking some great pictures and helping me with this project!